If you read Chris Schwarz’s blog at Popular Woodworking, there was recently an interesting post about wedged dovetails. Historically it’s been said that wedging was done primarily to close up gappy or sloppy dovetails. In the coments of that post a gentleman made a case for wedged dovtails as a normal way of construction used by Germanic woodworkers in the past. I would like to agree with this contention for the most part. I would like to re post the comment here but I don’t know if that is allowable so here is the link again. It’s well worth the read, for those that are not familiar with wedged dovetails here are some pictures and comments.
This is a drawer out of a vernacular table that either originated in Wisconsin between 1850 and 1880 or was brought here during that period. The table is solid cherry, the drawer is a box with a 1/4 inch cherry panel glued to the front. The box appears to be poplar with a pine bottom.
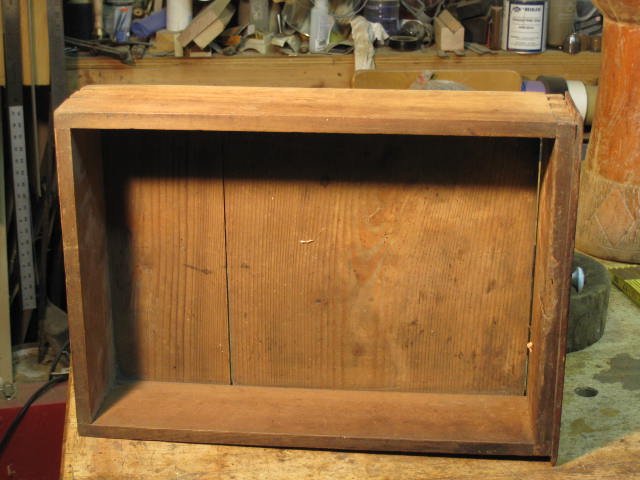 Here is a better view of the cherry panel glued to the drawer box.
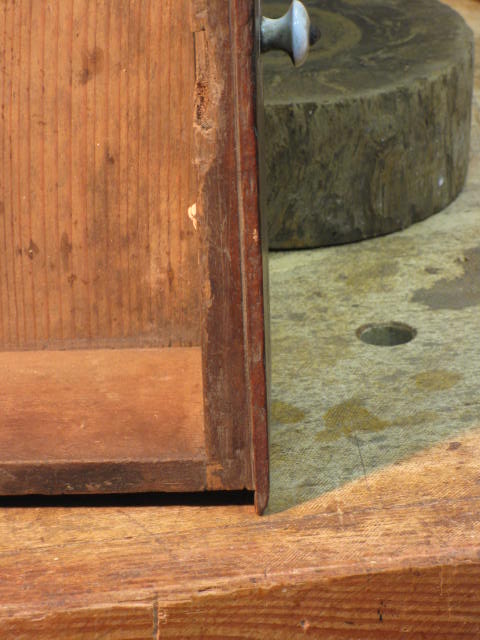 Here we see a wedge in the top of each pin. All 12 pins are wedged, note that the wedges are not in the center of the pins, but they are in the interior of the pin not next to them. It would seem that if they were just to fill a gap there wouldn’t be one in every pin, just where there was a gap.
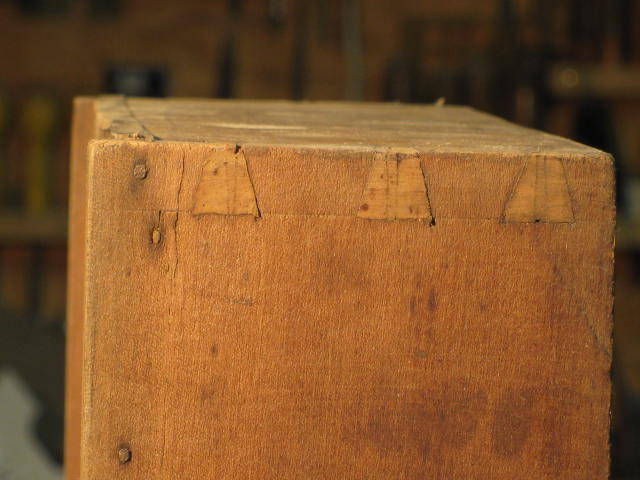 The wedges from the side of the drawer. There doesn’t seem to be a saw kerf that the wedges were driven into. I think that each pin was quickly split with a chisel by eye after the box was assembled, and the wedge driven into the split and then trimmed.
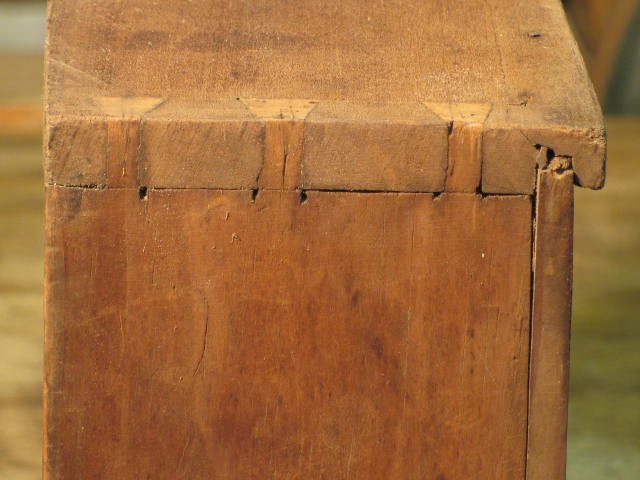 On the drawer front it appears that the drawer side was nicked with the chisel when the pins were split.

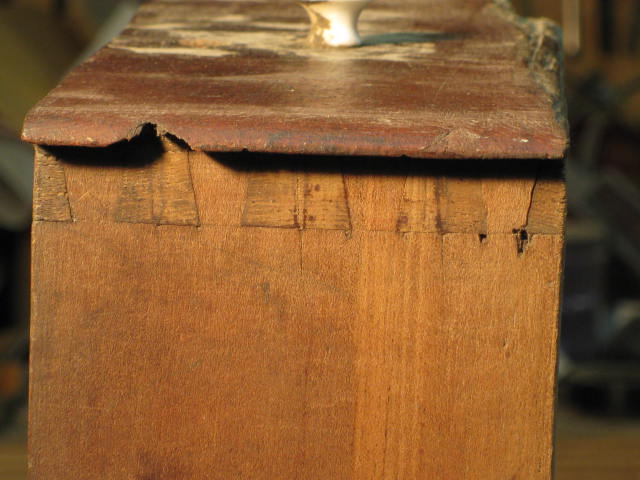
In this orientation, it seems as though the wedges are used to lock the dovetails in the direction from which you would assemble them. In other words, this effective makes a dovetail that not only flares to the front, to keep the front from pulling off, but also to the side to keep the sides from disassembling. This would more or less eliminate the need for glue. On my first dovetailed practice boxes I used a few carefully placed finish nails to the same effect.
I wonder if the tails are then cut at a bias across the end grain to facilitate the wedge locking mechanism, or if the compression of the wood/looseness of the joint is enough?
Using these wedges could also allow for a looser initial fit, which could help to reduce the amount of fitting down, potentially saving quite a bit of time at that stage (particularly for the novice craftsman).
These, like many antique dovetails were done very quickly, they were laid out by eye, nothing appears to be measured. The dovetails and wedges were glued, in person you can see traces of hide glue. These joints are still tight enough that I can’t easily take them apart,so I don’t know if there is a bias on the tails, but it would make sense.
I also find the topic interesting. If I understand the comment on Chris’ blog right, the tail Kelley saw was somewhat compound angled to accommodate the wedged pin. I imagine that would make the pins act just like tails, if I may, after the wedge driven in. The geometry would make this joint incredibly strong, almost impossible to break.
But, from what I saw in the 4th picture above, the sides of the pin are still parallel. I wonder if my imagination was wrong, or there are different practices of wedged dovetail.
Sorry, English is not my language. If my wording cause any confusion, I’ll try again.
I have posted some pictures here.http://www.blogger.com/blogger.g?blogID=5965309449786983041#editor/target=post;postID=1757438391430368394
I have tried to include a couple that show what looks to me like a ” compound cut” as you describe. You have perfect English!
Almost impossible to break is exactly right. In fact that is what led me to the discovery in the first place. When a dismantled pipe organ came into the Taylor and Boody Organbuilders workshop years ago, it was my job to restore the case. One of the most daunting tasks was rebuilding the dovetail corners on the impost, a large dovetailed frame that had been driven apart when the organ was put into storage. All the other parts were small enough to store in the attic of the Home Moravian Church in Winston-Salem North Carolina except this one. It is huge and made of very thick material. I was amazed at the severe maul marks on the inside of the pieces, in both directions! Clearly someone had to work hard to take this thing apart.
For a time I just thought that someone did not how to knock a dovetail corner apart. Then after I had a chance to study the wedged dovetails corners on the other parts that were still together, I realized that it would have very difficult indeed to knock the impost apart. In fact pins had been broken off at their bases the blows had been so severe. And these were not the little pins you might see on a chest or case piece.
That is when I got interested in this construction!
Since then I have seen lots of chests with wedged joints. Most of them painted, some not. Sometimes it is easy to see the out of square cuts on the dovetails, many times it is not apparent. It is a source of confusion for me as well. A previous commenter wondered if just compression alone is sufficient. The problem with that is when I have tried that alone, I split the tail board board. Remember there is a lot of cumulative wedge thickness that winds up being driven in. There needs to be some place for all that to go. Also if compression alone is the answer, what is the point? The world is full of surviving chests in good condition without wedged joints where the sawing was done to produce a snug fit and glue did the rest.
I don’t pretend to have all the answers concerning this joint. My guess is that there are variations on its layout and execution just like the “regular dovetail joint” I really appreciate any insight someone might have.
By the way, I am not sure that wedged dovetail is the best name for this joint . That name is already used in the timberframe trade for another type of joint altogether. A friend has suggested split dovetail, but for me that somehow does not convey the locking aspect
Kelly, The link to your pictures says we need a password for us to see them.
Sorry for the bad link, try this:
http://woodwins.blogspot.com/2012/08/wedged-dovetail-pictures.html
Kelley. The wedged pins on the chests are on the show surface, the pins on the drawer are not, I wonder if that makes a difference. The dovetails on the chest appear to have been cut with much more care. I would like to see some more drawers.
Tom. I think you’ve got a point here. For drawers, case stands as constraint to side movement. The concerns are mostly limited to pulls and pushes. I guess that’s why tail boards are always the side boards. A Chest, on the other hand, have to consider forces from any direction.
Thanks Kelley, for the pictures. They really opened my eyes. Also, thanks to Tom (is it? I was so rude!). Your blog post and pictures bring the topic even further. Thank you guys.
Ethan, Your English is fine. I did not think you were rude.
I know I just left you a message on another post. But I have to tell you that I found another old piece with similar wedged dovetail here in Taiwan. Pics are in my blog.
http://fwwtw.blogspot.tw/2012/10/osuke.html
I am not sure if you read Chinese. But I believe you completely understand what’s going on in the pics.
It appears that the drawer front has half blind or lapped dovetails also pinned? Is this the case? Is that possible? How would one go about doing this?
wow! super!